How to Configure meta tags in React Apps Dynamically with a NodeJS Server
May 7th, 2020

Many people confuse react-helmet to be the solution for Search Engine Optimization (SEO) improvement in respect to meta tags configuration. This is not true. In this article, we'll learn how react-helmet works and how to dynamically update meta tags (using a NodeJS server) for SEO purposes.
Table of Contents
The place of react-helmet
react-helmet is used in React applications for updating meta tags dynamically. This is achieved with Javascript, hence it wouldn't work if Javascript is not supported or executed.
react-helmet is used in components which controls the meta tags at that particular instance.
A standard React application has an index.html file in the public directory which looks like this:
<html>
  <head>
    <title>React App</title>
    <meta name="viewport" content="width=device-width, initial-scale=1" />
  </head>
  <body>
    <noscript>You need to enable JavaScript to run this app.</noscript>
    <div id="root"></div>
  </body>
</html>
This is the head tag configuration that all pages (as configured with react-router-dom or any client-side routing package) would have. What I mean is, '/about' and '/contact' routes would have a title tag with 'React App'
When to use
react-helmet helps in modifying the head tags easily. This is better than a manual approach of using JavaScript to add elements to the head tag
How to use
First, you'd need to install the package in your project directory with this command:
npm i --save react-helmetLet's say we want to set the meta tags of a page called 'Contact us', we'd have the following:
import React from 'react'
import Helmet from 'react-helmet';
-----
const Contact = () => {
    return (
        <>
            <Helmet>
                <title>Contact us</title>
                <meta name='description' content='Contact us if you have any question or requests'>
            </Helmet>
            <main>
                Contact Us
            </main>
        </>
    )
}
-----
export default HelmetNote: <> is an alternative to React.Fragment. The only difference is that <> does not the key prop which is the only prop fragments can have.
With the example above, the meta tags would be updated whenever this component is used.
Where to use
react-helmet can be used anywhere. At any instance of it, the meta tags would be updated accordingly. For instance, if the Contact component above is used in a Nav component for example, and the Nav is used in a Home component which is a page, then the title of that page would be 'Contact Us'.
When you use two react-helmet components, the last declared component would be used. Remember that the component is just JavaScript with functions that are evoked. So this will make sense to you:
let a = 1 // first instance of react-helmet
a = 2 // second instance
console.log(a)
// 2
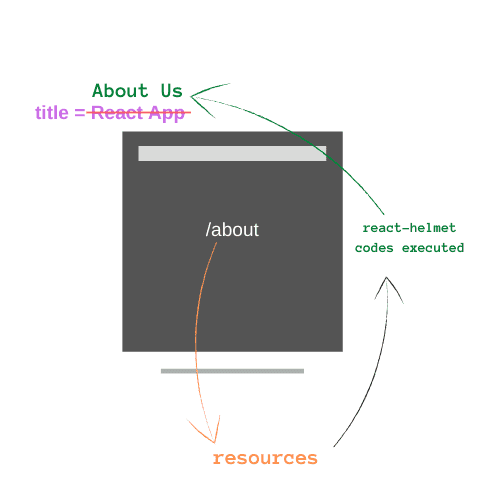
react-helmet operates very fast, hence its hard to notice, but what happens in the browser is this:
- Request a page with its path.
- Fetch the resources for that page.
- Load the default HTML (with meta tags, and title = 'React App').
- Execute the JavaScript codes of which the meta tags are updated via
react-helmet.
react-helmet is not the perfect solution
As I stated in few lines back, react-helmet consist of JavaScript codes which are executed by the browser. What this means is that if those functions are not evoked, every page would still have a title of 'React App'.
With all these said, you'll understand now that when you host your react application on any server, the meta tags are still the default. It only changes when a browser requests for the resources on a page, and the react-helmet functions used there are executed.
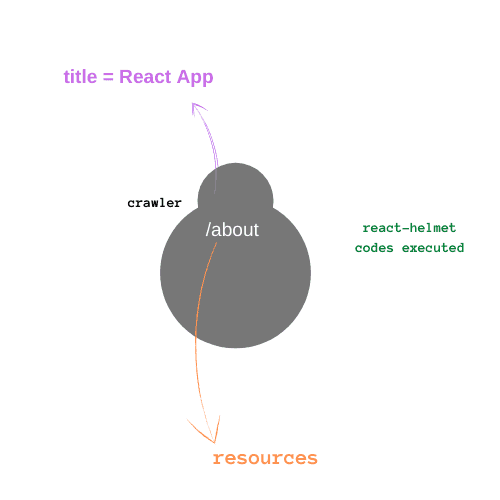
SEO bot crawlers do not execute JavaScript functions.
If any crawler crawls through a page on your React application, they'd index that page by the default meta tags (the title being 'React App'). So your client sees 'Contact Us' on the browser but the crawler sees 'React App'.
Here's more information in this video: How react-helmet is not a solution for improving the SEO of websites
You may not care about SEO, but another reason why you'd need to ensure correct tags is for example, services like twitter page summary which displays an image, title and description declared for your page. When you make a tweet with a URL, twitter attempts to get a preview of that URL. This means, it would make a request to the server holding the resources of that page. Twitter wouldn't help you run any JavaScript, hence, what would be returned back from the server would be 'React App' for title.
Note that in some React frameworks like GatsbyJS (that I know of), react-helmet works with gatsby-plugin-react-helmet to appropriately modify meta tags during their server-side rendering process. Asides frameworks like such, remember that react-helmet cannot work on its own until the functions are executed by the browser.
A better solution
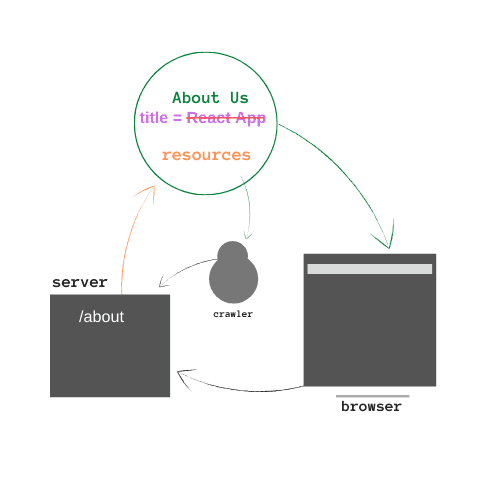
The solution is to dynamically configure the meta tags from the server before responding to the client (browser). This is just one out of other solutions (e.g hydration) available.
In the next section, we'd look at how to achieve this.
The goal is that, when a browser requests for any page, the server would update the meta tags before responding the client with the page's resources. This way, SEO crawlers or services like twitter page previews do not have to run any JavaScript. They only receive the resources from the server.
Note that if you're using the Link component provided by react-router-dom, you'd still need react-helmet when automatically updating meta tags from the server. This is because React is a Single Page Application (SPA). All resources which would be used by the website are pre-fetched. With the Link component, clicking a link from the homepage (for example) would not require requesting from the server anymore. Instead, the pre-fetched resources for that page would be used. This is the reason why Link components navigate faster.
With this behavior, when you request the index page of your React application, the server automatically changes the title tag to 'Homepage' (as you've configured) but navigating to other pages using Link component will make other pages have the title 'Homepage'. Remember that Link components do not make any request to the server, hence, they won't have the appropriate meta tags for other pages. Except by refreshing the page.
Therefore, react-helmet is beneficial on the client side when Link is used. Alternatively, you could use a (anchor tag) for links which ensures that every navigation will always request resources from the server.
How to configure meta-tags from a server
We'll be using NodeJS to serve the resources of our application. NodeJS will also be responsible for updating the meta tags before responding.
Your react application can be hosted on heroku server, digitalocean server or anywhere, but the same principle applies.
Let's look at this basic example, our main server file, server.js:
const path = require('path');
const express = require("express");
const app = express();
-----
app.use(express.static(path.join(__dirname, "build")));
app.get("*", (req, res) =>
	res.sendFile(path.join(__dirname, "build/index.html"))
);
-----
const port = process.env.PORT || 5000;
app.listen(port, () => {
	console.log(`Server started on port ${port}`);
})
From the above example:
express.staticis used to serve the static files in the react application.- the
buildfolder is the store for the static files (to be served) built withnpm run build. app.get('*')responds to all get requests with the index.html file in the build folder.
With these, the default tags would be returned in the response for every page. To configure the meta tags of each page, we'd need to attend to them differently.
An easy way to do this is to put a template string in public/index.html file (which results in build/index.html). Then, we'll target that string and replace it accordingly with respect to the page requested.
For example:
<html>
  <head>
    __PAGE_META__
    <meta name="viewport" content="width=device-width, initial-scale=1" />
  </head>
  <body>
    <noscript>You need to enable JavaScript to run this app.</noscript>
    <div id="root"></div>
  </body>
</html>
Next, we'd read the index.html file, replace __PAGE_META__ with the meta tags we want and send the updated content.
In the server.js file, we'd add the following:
const path = require("path")
const express = require("express")
const app = express()
const fs = require("fs")//
const pathToIndex = path.join(__dirname, "build/index.html")app.get("/", (req, res) => {  const raw = fs.readFileSync(pathToIndex)  const pageTitle = "Homepage - Welcome to my page"  const updated = raw.replace("__PAGE_META__", `<title>${pageTitle}</title>`)  res.send(updated)})//
app.use(express.static(path.join(__dirname, "build")))
app.get("*", (req, res) =>
  res.sendFile(path.join(__dirname, "build/index.html"))
)
const port = process.env.PORT || 5000
app.listen(port, () => {
  console.log(`Server started on port ${port}`)
})
fs gets the content of index.html synchronously, replaces the template string with our desired meta, and sends the updated version as a response. You can do the same for other meta tags like '<meta name='description' content=${pageDescription}>' and so on.
Since the codes are ran by your server, you can also get dynamic values. For example, a product or user which you'd use /:id to get its details. You can perform the operations necessary to get its details before replacing the index.html file and sending back to the browser.
This way, you're sure that what the crawlers, the browser or twitter services gets in this correct meta tag configuration.
The caveat that comes with this approach is that you'd need to handle every path on your React application.
Wrap up
react-helmet is an awesome tool, but its benefits only appear on the client side. We'd need our server to configure the meta tags before responding to any client, because that client may not be able to run the JavaScript in react-helmet.
When using Link component, remember to use react-helmet as Link would not make any request to the server on navigation.
Thanks for reading : )
If this was helpful, please share.


